Delphi Stereo Wireless Remote
The PP603988 wireless remote control for Delphi heavy-duty stereos works with all IR remote capable Delphi HD stereos. The controller itself is well built and should provide many years of use.
The remote will include two internal coin cell batteries. There is no battery compartment to be accessed by the user. These two batteries should also last a few years, but that depends on frequency of usage.
Both Coin batteries are the same model and must always be the same model to prevent battery chemistry conflicts inside of the remote control and also to ensure proper operation of the internal circuitry.
How to Replace Remote Control Batteries
When it comes time to replace the batteries you will need to supply two (2) CR2032 coin cells. Any brand is acceptable, but as previously stated, both batteries must be same brand and model. Both batteries must be replaced. Do not ever replace just one of a pair of batteries in any device. Sometimes it won’t cause problems, but many times it will
Removing Back Cover
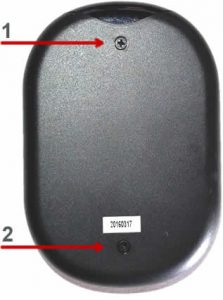
You will find two small phillips head screws on the back of the remote control which are recessed into the plastic housing. With a small phillips head screwdriver gently turn each screw counter-clockwise until screw is fully extracted.
Once both screws have been removed the top and bottom portion of the remote control housing should come apart with very little coaxing.
Battery Removal
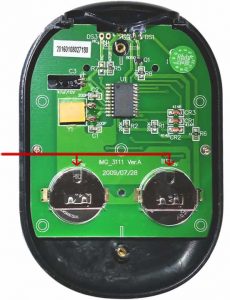
Both coin cell batteries are securely held in it’s own retainer. DO NOT PRY ON RETAINER! Gently slide the battery out of the retainer using your small phillips screwdriver. Be careful to not scratch or scrape the circuit board with the screwdriver or other tool you may have chosen to use.
The slotted area at the top of the battery retainer is provided as an access point for the tool you are using to remove the battery.
To remove the battery, the battery must be pushed from the retainer through the access point moving toward the open end of the retainer. Do not lift up on the battery.
Battery Replacement
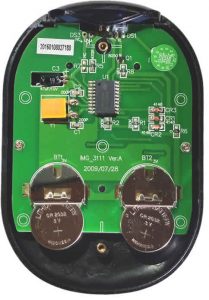
Gently insert the new batteries by sliding them into the retainer from the retainer open end.
Battery Polarity
Polarity refers to the flow of the electricity through the battery. Get it right and the device will work properly. If you get it wrong the device won’t work and could become ruined.
Battery Positioning and Polarity: The Positive (V+) side of the battery is the one that includes engraved battery information. The Negative (V-) side of the battery is smooth with no writing or engraving. The Negative (V-) side faces down in the battery retainer. The Positive (V+) side faces up in the battery retainer.
Note: when battery is inserted properly in the retainer you will be able to read the writing on the positive (V+) side of the battery.
Replacing Back Cover
This is basically the reverse of disassembly. Gently fit the back cover to remote control. There is no snap. The halves will not snap together. Be careful to not cross thread the screws by placing the screw tip into the hole then slowly turn the screw in the counter clockwise direction until you feel a little bump meaning the threads of the screw have aligned with those of the remote screw stud. Now turn the screw in the clockwise with your fingers to get it started. Continue with your phillips screwdriver until the screws are fully inserted.
Note: Screws are made of steel. The remote body and threaded screw studs are made of plastic. Over-tightening the screws will destroy the threads inside the plastic screw studs.
If you are interested in purchasing a new remote control, you can find the same delphi remote used in this article for sale here.