
How to Wire a Power Relay in a Semi Truck
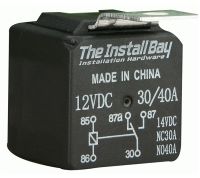
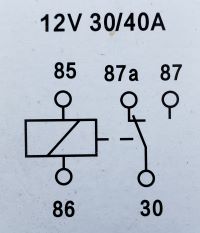
Though we'll be working with the RL3040 by Install Bay, many four and five terminal power relays function in the same way. If you're not using the RL3040 you'll want to compare the diagram included with your particular model relay to ensure proper wiring connections are made.
Preparation: Make sure all power to the radio and your PP602219 amplifier is disconnected. Basically just unplug the wire-harness that came with your PP602219 amplifier and make sure the truck ignition is turned off and the stereo is powered off.
For this job you will need a pair of crimp pliers, wire strippers, 4 female blade terminal crimp connectors, a small piece of heat shrink tubing and the RL3040 relay of course. You can buy the RL3040 relay online at the STS shop!.
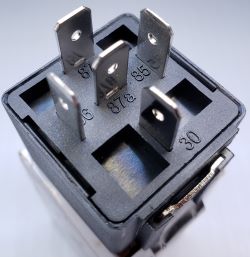
- Place a piece of heat shrink tubing over the center terminal (#87a) of the RL3040 relay and srink with heat to secure the terminal from accidental short.
- On the PP602219 amplifier harness closest to where it plugs into the PP602219 subwoofer box, cut the red power wire, blue remote wire and the black ground wire. Make sure to leave a about 5-inches of wire to work with nearest the PP602219 connector.
- Strip about 3/4 of an inch of housing from each of the cut wires.
- Neatly twist together the now exposed copper ends of both black (ground) wires. Push them firmly into the wire side of a female blade crimp terminal and crimp using crimp pliers. Then connect this ground wire to the relay terminal #85.
- Neatly twist the end of exposed copper from the red (12V+) wire coming from the battery. Push it firmly into the wire side of a female blade crimp terminal and crimp using crimp pliers. Then connect this power wire onto the relay terminal #30.
- Neatly twist the end of exposed copper from the red (12V+) which will feed into the PP602219 amplifier. Push it firmly into the wire side of a female blade crimp terminal and crimp using crimp pliers. Then connect this power wire onto the relay terminal #87.
- Neatly twist the end of exposed copper from the blue (remote turn on) wire coming from the stereo. Push it firmly into the wire side of a female blade crimp terminal and crimp using crimp pliers. Then connect this power wire onto the relay terminal #86.
- Aside from tidying up and sweeping up any wire bits on the cab floor, this job is done!
When key is turned forward and the stereo is powered on, the blue wire and ground wire together will activate the coil on terminals #85 and #86. This will move the internal connector to bridge the connection between terminals #30 and #87. Your amplifier will now get it's power from terminal #87. When the stereo is powered off the coil will pull the internal connector away from terminal #87 thus disconnecting power from your amplifier.