
International After 2007 with Panasonic Wiring
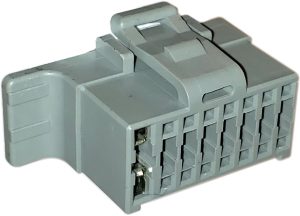
Typically the wiring in these connectors are all one single color, either all green, gray or white wires. If your International (or other semi) came from the factory with a Panasonic stereo and the connector looks exactly like the one shown here then we can help you modernize your truck wiring.
If your connector doesn’t look like this and your International is a model series 4000, 7000 or 8000 and was built from Sept 2002 through 2007 and has a small white 12-pin or 16-pin connector. You should look at our Yazaki Panasonic harness adapters. Yazaki 12-Pin 7222-1224 (PP202147) Yazaki 16-Pin 7222-1368 (PP202148)
The goal here is to remove this obsolete stereo connector and replace it with a modern ISO DIN connector. The trouble is figuring out which wires connect where. SemiTruckStereos.com has created the following Type-E pinout to help you upgrade the stereo in your big rig today and again down the road. Once you’ve completed the wiring upgrade all of our stereos will plug into your truck without further modification. Years from now when you want the new latest greatest stereo…. it will plug right in without modification. So let’s get started!
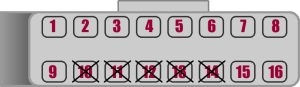
| Location | Function | Connect STS Wires | 1 | Constant Power 12V+ | Yellow | 2 | Ignition Power 12V+ | Red | 3 | Left Rear Speaker Negative (-) | Green /Black Stripe | 4 | Left Rear Speaker Positive (+) | Green | 5 | Right Rear Speaker Negative (-) | Purple /Black Stripe | 6 | Right Rear Speaker Positive (+) | Purple | 7 | Right Front Speaker Negative (-) | Gray /Black Stripe | 8 | Right Front Speaker Positive (+) | Gray | 9 | Ground Power Wire Negative (-) | Black | 10 | N/A Must be Factory Unpopulated | 11 | N/A Must be Factory Unpopulated | 12 | N/A Must be Factory Unpopulated | 13 | N/A Must be Factory Unpopulated | 14 | N/A Must be Factory Unpopulated | 15 | Front Right Speaker Negative (-) | White /Black Stripe | 16 | Front Right Speaker Positive (+) | White |
You’ll want to be very methodical during this next step. This is where you’ll be cutting your factory wiring and attaching the ISO DIN adapter. We prefer making wire connections using solder and heat shrink tubing, but wire crimp connectors are also a good choice. Do not just apply electrical tape to twist connected wires. Eventually the heat in the cab will melt the tape gum and it will cause connection issues later on down the road.
With our PP201746 wire harness in hand, begin with location #1.
- Cut Your Location #1 and connect the PP201746 Yellow wire.
- Cut Your Location #2 and connect the PP201746 Red wire.
- Cut Your Location #3 and connect the PP201746 Green w/Black wire.
- Cut Your Location #4 and connect the PP201746 Green wire.
- Cut Your Location #5 and connect the PP201746 Purple w/Black wire.
- Cut Your Location #6 and connect the PP201746 Purple wire.
- Cut Your Location #7 and connect the PP201746 Gray w/Black wire.
- Cut Your Location #8 and connect the PP201746 Gray wire.
- Cut Your Location #9 and connect the PP201746 Black wire.
- Cut Your Location #15 and connect the PP201746 White w/Black wire.
- Cut Your Location #16 and connect the PP201746 White wire.
Once you’ve completed this final step you’ll be able to connect any of our Aptiv or Delphi heavy duty stereos. No further wiring required.